Print Tools
Press the printer icon  /
/  to open the Printer Control Panel
  /
/  . The Printer Control Panel is used to control the printer for printing and regular maintenance. Popup the printer icon to close the Panel.

Start Job
Click Start Button  the system will send the current slice data to printer and start printing.
Pause Job
Click Pause  to suspend a printing job.
Resume Job
Click Resume  to resume a paused printing job.
Cancel Job
Click Cancel Job to cancel the current printing job.
Renaming a Printer
Double click the Printer Alias to inpout a new alias and press enter to finish renaming.
Upgrade firmware
An icon  will show next to the firmware version when there is new version firmware available. Double click the icon to start upgrading. Restart the printer when the upgrade is finished.
Fill Resin
Click Fill  to start pumping resin from the bottle into the tank. Click again to stop.
Redraw Resin
Click Redraw  to start redrawing resin from the tank back into the bottle. Click again to stop.
Full Screen Clean
Click Clean  to expose the entire screen in order to fully cure and clean the resin at the bottom of the tank. Debris from previous jobs may damage the LCD screen in the next job. The Clean function will form an entire resin film entrapping the debris from previous jobs. Once the resin film is removed, the resin tank is clean and ready for the next print job.
TIP
It is recommended to check the bottom of resin tank before every print job. When there are debris either floating in the resin or sticking on the bottom of vat, they may damage the LCD.
DO NOT remove the resin tank during cleaning exposure. After exposure, however, you may lift the resin tank to remove the cured resin film.
Show Logo
Show Logo  is used to verify if the LCD screen is functional. Before using this function, please remove the build platform and resin tank, then click Show Logo Button to show UNIZ logo on the LCD screen to test communication and LCD screen.
Reset Z-Axis Zero Position
Reset Z-axis Zero Position  is used to reset the zero of Z axis. Please remove the resin tank and wipe clean the build platform before using this function. On the popup box, click Yes Button, then push the build platform down manually to touch the LCD screen, then click Yes Button again, the platform will rise back to the upper position and finishes the process.
This function is used only when the model could not stick onto the platform because the Z axis does not cling to the LED screen during the printing of the first layer.
Z-axis Compensation
Click "Z-axis Compensation" button  open dialog, input a value and submit to finish the compensation function. "Z-axis Compensation" can only subtract (shorten) Z-axis height from the mechanical calibrated value.
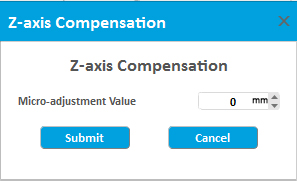
This function is used only when the printed model is smaller than the theoretical value on the Z axis direction. The adjustment value is equal to the theoretical value minus the actual value.
Calibration of Resin Level Sensor
Slash Plus Calibration of Resin Level Sensor
Users can recalibrate the resin level of Tank and Bottle including Tank Empty level, Tank Low Level, Tank High Level and Bottle Empty Level.
Click "Calibration of Resin Level Sensor"  to open a dialog box. In the interface, users can find Calibration Tank Level and Calibration Bottle Level.
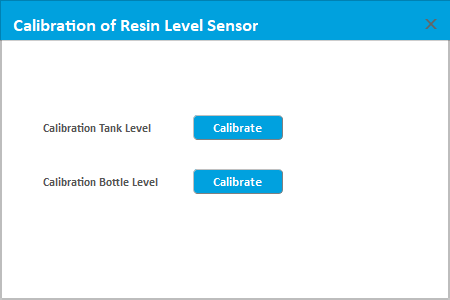
Calibration of Tank Resin Level Sensor
In the dialog box, click "Calibrate" button (right to "Calibration Tank Level") to pop up a dialog box of Tank Resin Level Calibration.
First users need to calibrate "Empty" resin level: Install an empty tank and install the resin level sensor in the tank. Click "Read", and click "Calibrate" and then click "Read" again. Cycle this until the value of "Tank Reading" is within ±50.
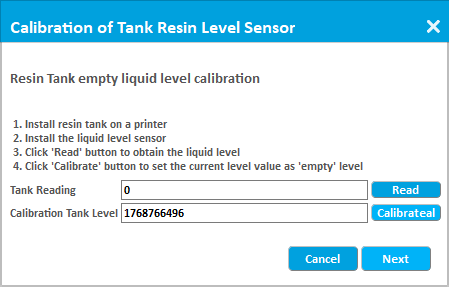
Click "Next" to go to interface of Low Level and High Level
Low Level Read: Add 3 mm height resin into the resin tank. Install the liquid level sensor. Click "Read".
High Level Read: Add 9 mm height resin into the resin tank. Install the liquid level sensor. Click "Read".
Low and High Level Calibration: Click "Calibrate".
Click "OK" to finish calibration
PS: Users can adjust tank resin level by "Fill" and "Redraw". Click "Previous" to go back to Empty level calibration.
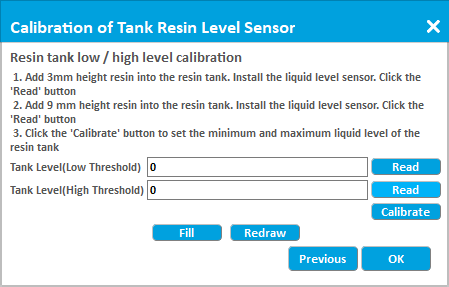
Calibration of Bottle Resin Level Sensor
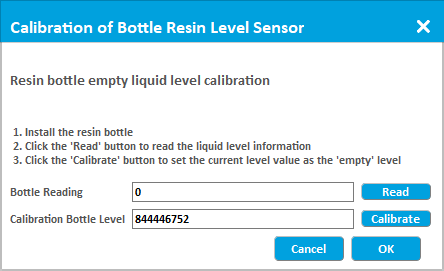
In the main dialog, users can click "Calibrate" button (right to "Calibration Bottle Level") to pop up a dialog box of Empty Bottle Resin Level Calibration.
Then users need to install an empty resin bottle, click "Read", and click "Calibrate" and click "Read" again. Cycle this until the value of "Bottle Reading" is within ± 50.
Then click "OK" to finish calibration.
Calibration of Slash2 Resin Level Sensor
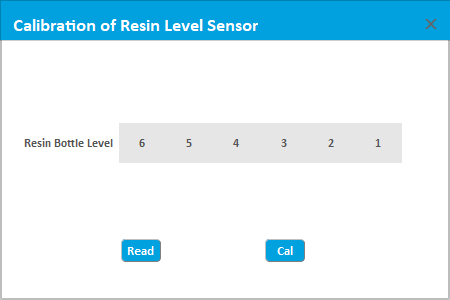
Users can recalibrate "Empty" resin level in resin bottle by Uniz software.
Click the "Calibration of Resin Level Sensor" button  to open a dialog. Install an empty resin bottle. Click "Calibrate".
Auto Pump
Click Auto Pump Button to turn on  / off
/ off  automatic pumping. If resin level is too low in the tank and 'Auto Pump' is on, the printer will pump resin from the bottle into the tank automatically.
Printer Settings
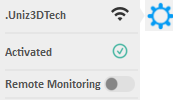
Press the Printer Settings Button ![]() to popup the submenu including three functions of the Network, Activation and the Remote Control.
to popup the submenu including three functions of the Network, Activation and the Remote Control.
a) Network
This shows the printer connection network status and provides network settings. It supports automatically obtaining IP address and manually setting fixed IP address.
Please view Set Printer Network for operation details.
This function only supports setting via USB connection.
TIP
The Printer's Wi-Fi feature supports 2.4GHz band only, it does not support 5 GHz connections.
b) Activation
This shows the activation status of the printer. Click to start activating. Please view Activate Printer for operation details.
c) Remote Control
This shows the remote control status. Users can manually turn on/off the remote control function.
When this function is started for the first time, the system needs to register the printer to the IoT which may take considerably long time.
c) Air Pump
Display running-time and recommended lifespan of Air Pump, click right button  , timer restart.
d) Resin Pump Tube
Display running-time and recommended lifespan of Resin Pump, click right button  , timer restart.
Upgrade License
An icon  at the bottom of the printer control panel means this type of printer can be upgraded to a higher level. Click the icon to start upgrading the license. Please view Upgrade License for operation details.
In This Article
Back to topThe Previous Articles
- Design Specification
- Installation & Setup
- Printer Network
- Activate the Printer
- Trial and Trial Expiration
- Upgrade the Printer License
- Upgrade the Printer Firmware
- Remote Monitoring
- Accessory replacing remind and timer reset
- Store
- library
- Set Up Your Print
- One Click Print
- Generate Support
- Slice
- Print Tools
- Edit 3rd Resin
- Edit Preference
- Additional Tools
Contacts
- Contact Us
-
9400 Activity Rd Ste L
San Diego, CA 92126, US - sales@uniz.com
- support@uniz.com
- pr@uniz.com


